在申请的测试服务器上安装miniconda和PyTorch
使用SSH客户端(OpenSSH、Shell7等)连接上测试服务器后,在SSH终端命令行执行安装
安装miniconda
- 下载miniconda软件
shell
wget https://mirrors.tuna.tsinghua.edu.cn/anaconda/miniconda/Miniconda3-latest-Linux-x86_64.sh安装miniconda软件,输入下面命令按照提示进行安装:
bash Miniconda3-latest-Linux-x86_64.sh- 点击control+C 跳过协议阅读
- 第一次输入yes启动安装
- 输入一个名字,用来创建存储安装包的文件夹
- 第二次输入yes完成安装
- 重启终端使用miniconda
修改conda配置信息:
在命令行输入conda config生成配置文件,然后修改配置文件的信息(方便以后安装python包),输入命令vim ~/.condarc进入配置文件中 改成:
auto_activate_base: false
channels:
  - defaults
show_channel_urls: true
default_channels:
  - https://mirrors.tuna.tsinghua.edu.cn/anaconda/pkgs/main
  - https://mirrors.tuna.tsinghua.edu.cn/anaconda/pkgs/r
  - https://mirrors.tuna.tsinghua.edu.cn/anaconda/pkgs/msys2
custom_channels:
  conda-forge: https://mirrors.tuna.tsinghua.edu.cn/anaconda/cloud
  msys2: https://mirrors.tuna.tsinghua.edu.cn/anaconda/cloud
  bioconda: https://mirrors.tuna.tsinghua.edu.cn/anaconda/cloud
  menpo: https://mirrors.tuna.tsinghua.edu.cn/anaconda/cloud
  pytorch: https://mirrors.tuna.tsinghua.edu.cn/anaconda/cloud
  pytorch-lts: https://mirrors.tuna.tsinghua.edu.cn/anaconda/cloud
  simpleitk: https://mirrors.tuna.tsinghua.edu.cn/anaconda/cloud
ssl_verify: false具体细节参考清华镜像
- 一些conda常用命令
she
conda config --show  # 查看所有的配置选项
conda config --show channels    #显示配置文件中的下载源

conda config --remove channels 源url # 删除镜像源- 用命令
nvidia-smi查看显卡型号
安装pytorch-gpu
- 创建虚拟环境(创建Python3.7的环境,如果创建高版本的Python,那么下面安装PyTorch的命令会因为依赖包的版本不适配报错)
shell
conda create -n torch python=3.7- 激活虚拟环境
shell
conda activate torch- 在torch环境安装pytorch
因为测试服务器中已经安装好CUDA(可用命令nvcc -V查看安装的CUDA版本),因此直接安装PyTorch就可以
shell
conda install pytorch-gpu matplotlib jupyter notebook -y #这样子会安装比较老的版本如果要安装比较新的版本建议去官网看:pytorch-previous-versions
# 如果你在137~139服务器可以使用以下命令安装 CUDA 11.3,安装会比较慢,给它点耐心
conda install pytorch==1.10.0 torchvision==0.11.0 torchaudio==0.10.0 cudatoolkit=11.3 -c pytorch -c conda-forge按照上述流程安装应该就可以了,有需要的可查看更详细的安装教程链接
- 安装好了打开python看看:
shell
pythonpython
# 测试pytorch能否成功使用GPU
import torch
torch.cuda.is_available()

# 显示True则代表安装成功- 环境相关操作
shell
删除环境(如果以后需要):
conda remove -n torch --all

退出环境(如果以后需要)
conda deactivate

查看conda环境列表:
conda env list
安装OpenCV
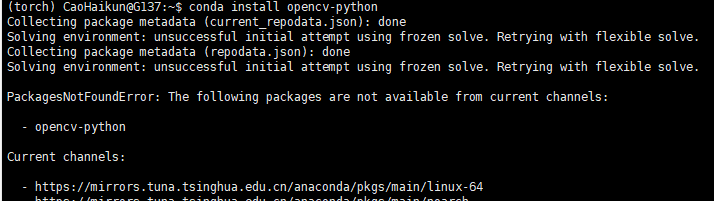
切换到torch虚拟环境,输入命令pip install opencv-python进行安装,不需要额外的命令参数:

注意不要使用conda install opencv-python,会报错提示当前的channels无法安装opencv:
设置免密登入
- 在客户端(自己的电脑,该段操作都是在客户端进行)上生成密钥,如果有就跳过
shell
cd ~/.ssh
ssh-keygen -t rsa- 读取并复制公钥匙
shell
cat id_rsa.pub- 客户端使用指令向服务端进行密钥发送
shell
ssh-copy-id [你的用户名]@[xx.xx.xx.xx服务器主机名]